Introduction
A cut list is the foundation of any woodworking project. Before touching a saw, you need to know exactly which pieces to cut, in what dimensions, and from which panels. Done right, a cut list reduces offcuts, saves money, and prevents costly mistakes at the workbench.
Whether you’re building a cabinet, a bookshelf, or a full kitchen, the process is the same. This guide walks you through every step — from listing your parts to generating an optimized cutting layout — using both metric (mm) and imperial (in) units.
Step 1 — List Every Part You Need to Cut
Start with your project drawing or design. Write down every single piece: shelves, sides, back panels, doors, dividers. Nothing is too small to include.
For each piece, record:
A typical entry looks like this: Side Panel — 720 × 350 × 18 mm — Qty: 2 — Grain: lengthwise.
At this stage, don’t worry about which panel each piece comes from. Focus only on completeness. A missing piece discovered mid-cut wastes both material and time.
Step 2 — Define Your Panel Stock
Once your parts list is complete, define the raw panels you’ll be cutting from. Standard full sheets are typically 2440 × 1220 mm (8 × 4 ft), but panels also come in 2500 × 1250 mm or 3050 × 1220 mm formats depending on your supplier.
Key parameters to set for each panel:
The kerf is often forgotten by beginners. On a sheet with 20 cuts, a 3 mm kerf represents 60 mm of lost material — enough to lose a small piece entirely. Always enter your actual blade kerf before optimizing.
If you’re unsure about the weight or quantity of panels you’ll need, the wood panel weight calculator on Offcut helps you estimate load and purchasing quantities before you order.
Step 3 — Organize and Clean Your Cut List
Before running any optimization, review your list for errors. This step takes five minutes and prevents serious problems downstream.
Check for:
A clean cut list is also easier to import into software. Most tools — including Offcut — accept CSV or JSON input, so you can prepare your list in a spreadsheet and upload it directly. This is far faster than re-entering data manually, especially on projects with 30+ pieces.
Step 4 — Run the Optimization
This is where manual work ends and smart software begins. A cut list optimizer takes your parts and your panels, then calculates the most efficient arrangement — minimizing offcuts and maximizing material use.
Offcut uses advanced bin-packing algorithms that consider:
To try it, go to app.offcut.tools, enter your parts (manually or via CSV import), set your panel dimensions and kerf, then click Optimize. The result appears in seconds.
A standard bookshelf project — 12 parts cut from two 2440 × 1220 mm sheets of 18 mm plywood — typically reaches 88–93% material efficiency with proper optimization. Manual cutting layouts rarely exceed 75–80%.
The difference is real: on a €40 sheet, that’s €8–10 saved per panel. Across a kitchen project with 15 sheets, the savings exceed €120 in material alone.
Step 5 — Review the Cutting Layout
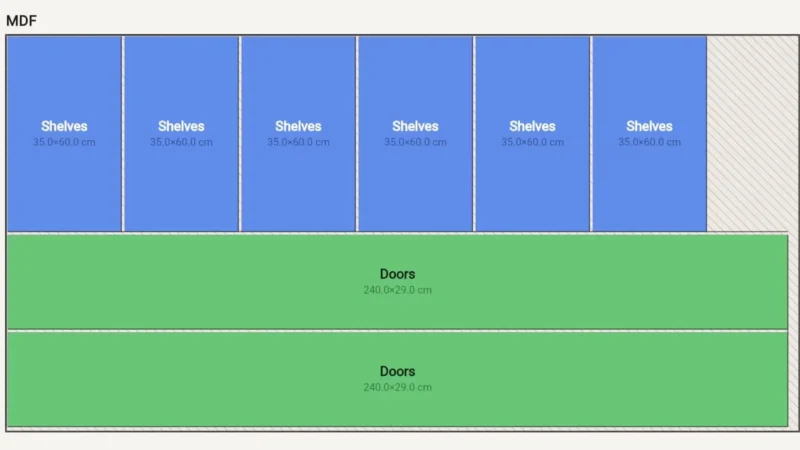
Once the optimization runs, study the visual layout before cutting anything. Look for:
Good cut sequence practice: always make the longest rip cuts first to keep the panel stable, then crosscuts, then smaller detail cuts. This reduces the risk of the panel shifting or binding the blade.
If your cutting plan includes shelves or structural panels, check the expected deflection before finalizing thickness. The shelf deflection calculator on Offcut lets you verify that a 18 mm shelf won’t sag under load — before you cut.
Step 6 — Export and Use Your Plan
A cutting plan is only useful if you can bring it to the saw. Export your optimized layout in the format that fits your workflow:
Offcut supports all these formats on both free and premium plans. The free tier is fully functional for small projects — no account required to run your first optimization.
Label each physical panel as you cut. Mark piece names directly on the wood with a pencil before making any cuts. This eliminates confusion when you have 20+ pieces on the floor.
Conclusion
Creating a cut list is the single most impactful habit a woodworker can build. It transforms guesswork into a repeatable, efficient process — and the time invested upfront pays back every time you’re at the saw.
The six steps above apply to any project: furniture, cabinetry, shelving, or construction panels. Start with a complete parts list, define your stock correctly, clean your data, optimize, review, and export.
Ready to build your first optimized cutting plan? Open Offcut for free — no registration required. Enter your pieces in mm or inches, and get a visual layout in seconds.