Introduction
Every DIY furniture project starts the same way: a sketch on a napkin, a list of parts scribbled on your phone, and then a trip to the hardware store where you guess how many panels to buy. Sound familiar? A proper wood cutting plan for your DIY furniture project changes everything. It tells you exactly which pieces to cut from which panel, in what order, and how to minimize offcuts. Whether you’re building a floating wall shelf or a full TV unit, a structured cutting plan saves you money, time, and frustration at the saw. This tutorial walks you through the process from scratch, using a concrete example you can follow along with.
Step 1 — List Every Part Your Furniture Needs
Before touching any software or tool, grab a pen and paper. Your goal is to produce a complete cut list: every single piece of wood that makes up your furniture, with its length, width, and quantity.
Take our example: a wall-mounted shelf unit, roughly 80 cm wide and 180 cm tall, with five shelves. Here’s what the cut list looks like:
| Part | Dimensions (mm) | Qty |
|---|---|---|
| Side panel | 1800 × 300 | 2 |
| Shelf | 776 × 300 | 5 |
| Back panel | 1800 × 800 | 1 |
| Top cap | 800 × 300 | 1 |
| Bottom base | 800 × 300 | 1 |
A few important tips for this stage: always add 1–2 mm tolerance per piece to account for the saw blade kerf (the material lost during cutting). If you plan to edge-band the panels, factor that into your finished dimensions before entering them. And if a piece has a grain direction that matters — like a decorative veneer — note it now.
Don’t rush this step. A missing piece discovered at the hardware store is painful. A missing piece discovered halfway through assembly is worse.
Step 2 — Choose the Right Panel Type and Size
Most DIY furniture is built from sheet materials: MDF, plywood, chipboard (particleboard), or OSB. Each has its strengths.
Standard panel sizes vary by country and supplier, but common dimensions are 2440 × 1220 mm (the classic “8×4 foot” sheet) or 2500 × 1250 mm in metric regions. Always check what your local hardware store or mill actually stocks before planning — there’s no point optimizing for a panel size they don’t carry.
For our shelf unit example, we’ll work with 18 mm MDF panels at 2440 × 1220 mm. This is a safe, widely available choice that cuts cleanly and finishes well.
Step 3 — Enter Your Dimensions into an Online Cutting Optimizer
This is where the real magic happens. Instead of hand-drawing layouts on graph paper (which takes forever and rarely optimizes well), use a dedicated online cutting calculator to do the heavy lifting.
Head to Offcut — the free online panel cutting optimizer. Here’s how to use it for our shelf unit:
Add your stock panels. Click “Add panel” and enter the dimensions of your MDF sheet: 2440 mm × 1220 mm. If you think you’ll need two sheets, add two. You can always remove one if the optimizer fits everything on a single panel.
Enter your parts list. For each piece in your cut list, add the dimensions and quantity. Enter the side panels (1800 × 300, qty 2), the shelves (776 × 300, qty 5), the back panel (1800 × 800, qty 1), and so on. If grain direction matters, use the “fixed orientation” toggle so the optimizer won’t rotate those pieces.
Set the saw kerf. A standard circular saw or table saw removes about 3 mm of material per cut. Enter this value in the kerf setting so the optimizer accounts for it in the spacing between pieces.
Run the calculation. Click “Optimize” and the tool applies a MaxRects or Guillotine algorithm to pack your pieces as efficiently as possible onto the available panels. The result appears instantly as a color-coded visual layout.
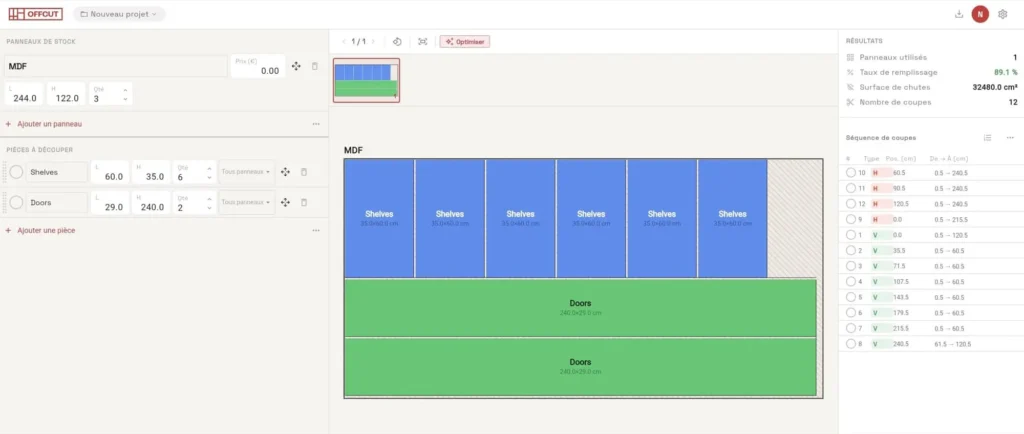
The optimizer will show you the waste percentage — for our shelf unit, a well-optimized layout typically lands between 12% and 20% waste depending on the piece mix. If the number is high, try adjusting panel size or splitting pieces differently.
Step 4 — Read and Verify the Generated Cutting Layout
A cutting layout diagram might look like a colorful puzzle, but it carries specific information you need to understand before picking up a saw.
Each colored rectangle represents one piece of your furniture. The number or label inside matches the part name from your cut list. The position of each rectangle on the panel tells you exactly where to make each cut.
Reading the layout correctly means following the cut sequence. Guillotine-style cuts go from edge to edge of the panel — you can’t jump to a corner cut. The optimizer usually numbers the cuts or color-codes them by sequence. Start with the long rip cuts that divide the panel into strips, then make the cross cuts within each strip. This sequence keeps the panel stable and reduces measurement errors.
Before committing to cutting, double-check a few things: Are all the pieces present? Do any large pieces like the back panel need to come from a second sheet? Are grain directions respected for any decorative panels? If something looks off — a piece that seems too small or a suspicious gap — go back to step 3 and verify your entries.
This verification step takes five minutes and can save you an entire panel.
Step 5 — Export the PDF and Head to the Workshop (or the Mill)
Once you’re satisfied with the layout, export it as a PDF directly from Offcut. The export includes the full visual layout for each panel, a summary cut list, dimensions labeled on each piece, and the waste statistics.
This PDF serves two purposes. First, it’s your personal cutting guide at the workshop. Print it out or keep it open on your phone. Cross off each piece as you cut it — it’s deeply satisfying and prevents confusion when you have a dozen similar-looking pieces stacked on the floor.
Second, it’s a professional document you can hand to a carpenter, panel saw operator, or mill. Rather than trying to describe verbally which cuts you need, you show them a precise plan. Most mills that offer panel cutting services will work directly from a PDF cut list like this, and some may even charge you less because you’ve done the planning work for them.
| What the PDF export includes | Why it matters |
|---|---|
| Color-coded visual layout per panel | Easy to follow at the saw |
| Labeled dimensions on each piece | Reduces measurement errors |
| Waste percentage summary | Helps you decide if a second panel is worth buying |
| Full cut list table | Quick reference when assembling |
Conclusion
Building a wood cutting plan for a DIY furniture project doesn’t require expensive software or years of experience. It requires a clear parts list, the right panel choice, and a few minutes with a good tool. The five steps in this tutorial — listing parts, choosing the panel, entering data, reading the layout, and exporting the PDF — apply to any project, from a small floating shelf to a full kitchen cabinet run.
The difference between winging it at the hardware store and walking in with a precise plan is usually one or two saved panels per project. Over a year of DIY work, that adds up. Start your next project right: use the free online cutting plan calculator at Offcut and go from sketch to cut list in minutes.