Introduction
Building a fitted kitchen from scratch — or even installing flat-pack cabinets — requires one critical step that many DIYers and professionals overlook: the cutting plan. A kitchen cabinet cutting plan (called plan de débit in French) is the organized list of every panel piece you need, mapped onto your stock sheets in the most efficient way possible. Without it, you risk costly mistakes, miscut panels, and significant material waste. This tutorial walks you through the complete method for planning, optimizing, and executing a kitchen panel cut layout, from measuring your space to opening a ready-to-use project directly in an online cut list calculator.
Stage 1 — List Every Kitchen Component with Precise Dimensions
The foundation of any good cutting plan is an exhaustive component list. For a standard 3-meter kitchen, this typically includes base cabinet carcasses, wall unit carcasses, internal shelves, drawer bases, back panels, door fronts, and filler strips.
Start room by room, cabinet by cabinet. For each unit, note the finished dimensions of every panel it requires. A typical 600mm base cabinet, for example, needs two side panels (560 × 720 mm), one bottom (560 × 558 mm), one top rail, and one back panel in thinner sheet.
Be precise with your thickness too. A 18mm board cuts differently than a 16mm one, and mixing them accidentally on the same stock sheet is a common — and expensive — beginner mistake.
Here is a simplified example component list for a three-unit kitchen section:
| Component | Qty | Width (mm) | Height (mm) | Material |
|---|---|---|---|---|
| Base side panel | 6 | 560 | 720 | 18mm chipboard |
| Base bottom panel | 3 | 558 | 560 | 18mm chipboard |
| Wall unit side panel | 4 | 300 | 600 | 18mm chipboard |
| Shelf (adjustable) | 8 | 556 | 298 | 18mm chipboard |
| Door front (base) | 3 | 596 | 716 | 18mm MDF |
| Door front (wall) | 2 | 596 | 596 | 18mm MDF |
Once your list is complete, group pieces by material type and thickness. Door fronts in MDF will go onto different stock sheets than structural carcass parts in chipboard.
Stage 2 — Choose Your Sheet Material and Understand Its Constraints
The most common materials for kitchen cabinets are melamine-faced chipboard (particleboard), moisture-resistant MDF, and birch plywood. Each has specific cutting rules that directly affect your layout.
Melamine chipboard is the industry standard for carcasses. It’s economical, available in large sheets (typically 2440 × 1220 mm or 2800 × 2070 mm), and easy to cut cleanly with a fine-tooth blade. The surface finish means you must respect grain direction if the board has a wood-grain texture.
MDF is the go-to material for kitchen door fronts and painted cabinet faces. It cuts cleanly, has no grain direction to worry about, and takes primer excellently. However, it’s heavy and slightly more expensive, so optimizing your layout is especially important for cost control.
Plywood offers the best structural strength and is preferred for high-end joinery, humid environments, or when clients want a visible natural wood finish. Grain direction is mandatory here — every visible face must run the same way.
A key constraint to build into your cut list software is the saw kerf: the material lost to each cut, typically 3–4 mm per blade pass. Ignoring this across 40+ cuts on a kitchen project can mean running short of a full panel without warning.
Stage 3 — Optimize the Layout with an Online Cutting Plan Tool
This is where a free sheet cutting optimizer transforms hours of graph-paper planning into minutes of precise, automated layout. Rather than manually arranging pieces on a sheet, you input your stock dimensions, your piece list, and your constraints — and the algorithm finds the most efficient arrangement.
Here is the typical workflow using an online cut list calculator:
A good optimizer will show you the waste percentage per sheet, highlight off-cuts large enough to reuse, and let you adjust the layout manually if needed.
For a real kitchen project with 35–50 individual panels, using an online cutting plan tool can cut material costs by 15–25% and eliminate the mental load of manual arrangement.
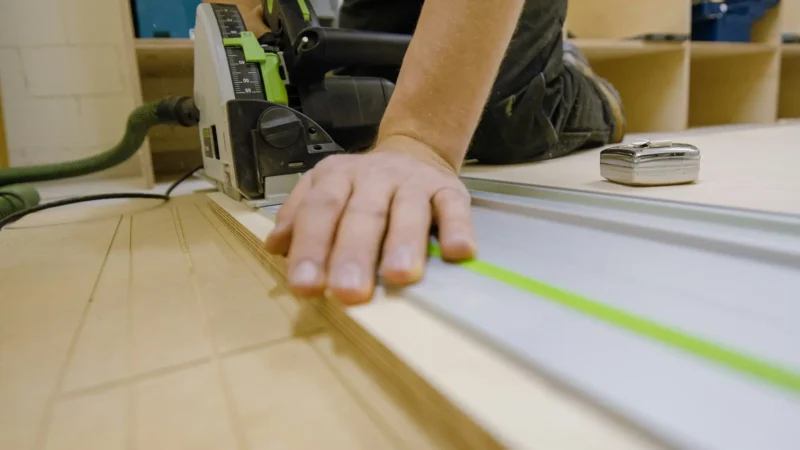
Stage 4 — Practical Execution Tips for Cutting Kitchen Panels
An optimized cutting plan is only as good as its execution. Here are the key principles that professional cabinetmakers follow on the workshop floor.
Always start with the largest cuts first. Crosscut your full sheet into manageable sections before ripping to final width. This keeps the sheet stable and reduces the risk of a bind midway through a cut.
Label every piece immediately after cutting. Use a pencil or masking tape to mark the component name, cabinet it belongs to, and which face is the show face. A kitchen project generates dozens of similar-looking rectangles — without labeling, assembly becomes a puzzle.
Check your measurements twice before the first cut. A misread dimension on a door front costs you an entire MDF panel, not just one piece. On a custom kitchen, remachining a facade means a delay of days, not hours.
| Common Mistake | Consequence | Prevention |
|---|---|---|
| Ignoring saw kerf in the cut list | Running short of panels mid-project | Set kerf in your optimizer settings |
| Mixing material thicknesses on one sheet | Structural misalignment at assembly | Group by thickness before optimizing |
| No grain direction constraint on doors | Visible texture mismatch across fronts | Enable grain lock in your cutting software |
| Cutting without labeling immediately | Confused assembly, lost pieces | Mark every piece the moment it’s cut |
Finally, save your cut list project file. If you need to recut a damaged panel weeks later, having the original optimized layout means you can pull the exact dimensions immediately rather than remeasuring.
Conclusion
A cutting plan for a kitchen cabinet project is not optional — it is the difference between a professional result and an expensive guessing game. By systematically listing every component, grouping pieces by material, respecting grain direction and kerf, and running your layout through an optimization algorithm, you save both money and time on every kitchen build.
The method described in this tutorial works whether you’re building three base units or a full 6-meter bespoke kitchen. The principles remain the same; only the scale changes.
Ready to build your kitchen cutting plan right now? Open the free cutting plan calculator on Offcut and input your first kitchen project — no installation, no registration required. You can export your optimized layout as a PDF in minutes and walk into your workshop with a complete plan in hand.
Offcut tools to go further
- 📊 Wood weight calculator — estimate the mass of your panels instantly, before assembly or transport.
- 📐 Shelf deflection calculator — check the strength and predicted sag of your shelves under load.
- 🪵 Offcut app — cutting plan — generate an optimised cutting plan in a few clicks.